Setting up Trusted HPC System in the Cloud
The emphasis on security in computer systems has been increasing day by day, as the users are getting more concerned about data privacy issues. Cloud providers have started to provide the ability of secure execution on sensitive data using additional mechanisms for security on top of the isolation provided by the traditional usage of virtual machines (VMs). The provision of secure enclaves with the help of hardware based trusted execution environments (TEEs) seems a ubiquitous trend. Examples of deployment of such secure enclaves include: AWS Nitro Enclaves, Google Confidential Cloud Computing, Microsoft’s Azure Confidential Computing, and IBM Cloud Data Shield.
In this blog post, we will take a look into how to build a simple experimental set-up in Google Cloud for running HPC-like workloads securely. Recently, Google’s confidential cloud computing initiative announced the availability of confidential virtual machines based on AMD’s SEV (secure encrypted virtualization) for trusted execution support. When SEV is enabled, all data stored in the main memory for a particular virtual machine (VM) will be encrypted. This ensures the data cannot be read by other VMs, the hypervisor, or even individuals with physical access to the main memory hardware.
The HPC workloads are mostly distributed and scale across multiple machines/nodes (e.g. using OpenMPI). High bandwidth network interconnects are used for communication among these nodes at HPC centers. Unfortunately, SEV does not have support for secure multi-node computation yet. If you are executing workloads which scale across multiple VMs on different nodes, the data can’t be sent encrypted across them with SEV since each VM has it’s own key (generated at random by the hardware). Moreover, SEV makes use of the data’s physical address in its encryption function in addition to the key, thus making the transfer of encrypted data even harder. Today, in Google Cloud infrastructure, if the boundary of one of Google Cloud’s data-centers is not passed, there is some kind of authentication provided for the communication between different nodes, however the communication still happens in the clear. Therefore, in this blog post, we will make use of a VPN connection to enable secure communication. Although a VPN based secure communication is expected to be slow, currently it seems to be the only way of securing communication out of the box.
The first part of this blog post presents some performance data to find out what kind of slowdowns can be expected on Google cloud VMs on top of un-secure execution. The second part of the blog (Appendix) discusses a step-by-step guide to setup Google cloud VMs with all the necessary tools required to run the tests presented in this write-up.
Performance Analysis
Here, we will look into some performance data to analyze the slowdowns that secure execution can lead to. We use MPI workloads in these tests, which are very common in HPC domain. There are multiple open-source MPI implementations (OpenMPI, MPICH, MVAPIC) available and potentially can be used inside VMs. We use OpenMPI at this point and build and use it wih UCX which is a framework (collection of libraries and interfaces) to allow building various HPC protocols like RMA, fragmentation, MPI tag matching etc. and supports different transport protocols for communication like RDMA, TCP, shared memory etc. Steps taken to install OpenMPI, UCX and some MPI workloads are provided in the Appendix section.
Figure 1 and 2 (below) show the bandwidth and latency numbers for selected micro-benchmarks from OSU MPI micro-benchmarks suite. Three different configurations shown in the figures are described below:
No_Conf: No confidentiality support (SEV is disabled)
Conf: Confidentiality support (SEV) is enabled, but communication channel is un-encrypted
VPN_Conf: Confidentiality support (SEV) is enabled, and communication channel is secure using a VPN connection
As shown in Figure 1 and 2, although the bandwidth and latency numbers are pretty close for No_Conf and Conf configurations, the numbers are much worse when VPN is used for communication. This is an expected result as VPN based communication can be very slow.
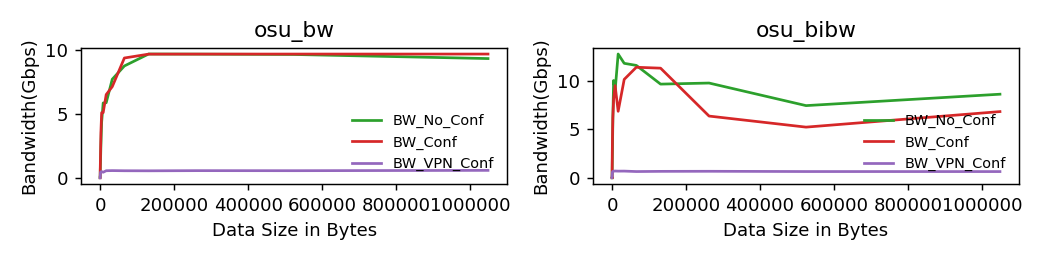
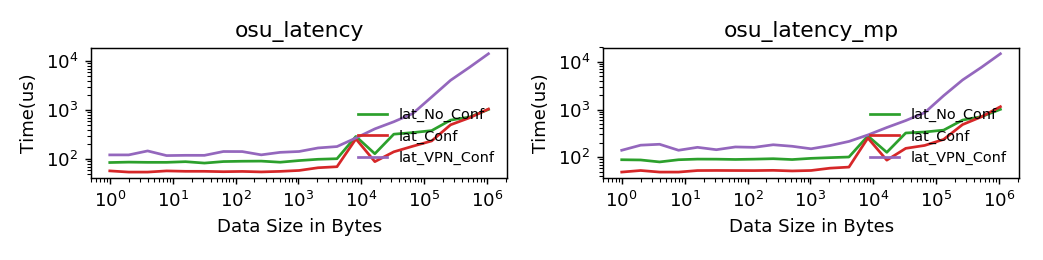
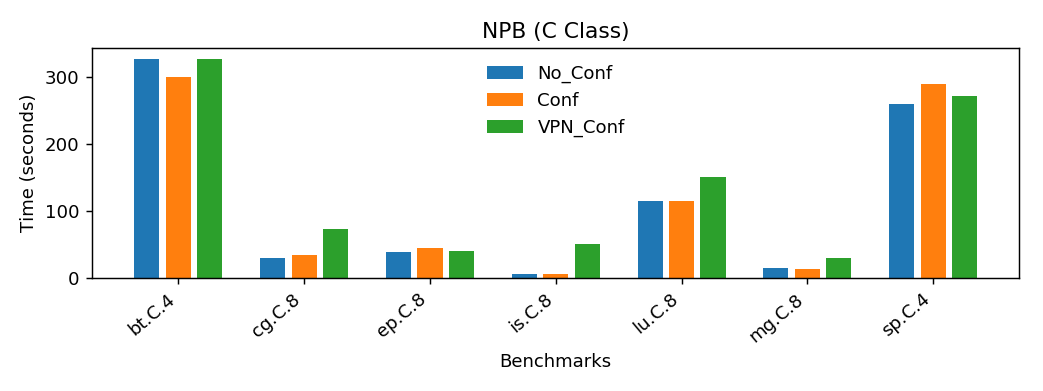
Figure 3 shows the execution time for NAS Parallel Benchmarks (C Class), which are often used to benchmark HPC systems, under three different configurations defined above.
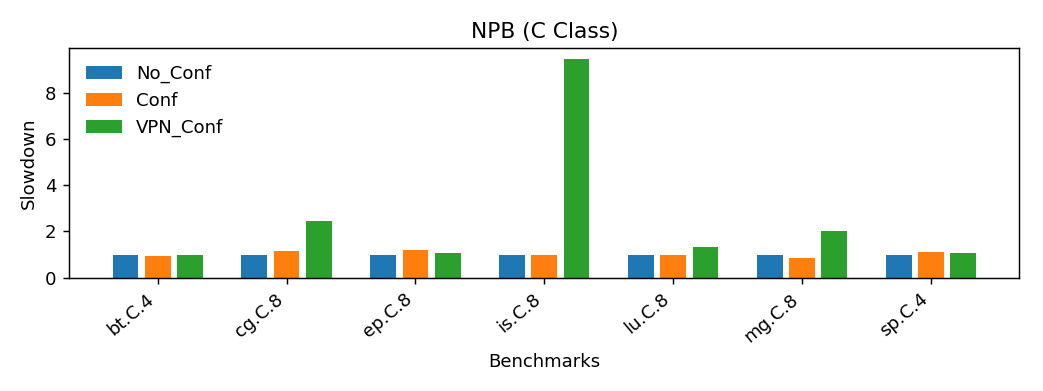
Figure 4 shows the same data in the form of observed slowdown in comparison to un-secure execution.
As can be seen in the figure, the slowdown with Conf configuration suggest no significant performance degradtion.
The slowdown with VPN_Conf for most of the benchmarks is not as bad as in the above microbenchmarks.
However, it should be noted that we were limited by the maximum number of processes which is one of the reasons the tests do not involve higher level of classes of NAS Parallel Benchmarks (e.g. D Class) which are more representative of the HPC workloads that scientists will be interested in.
Conclusion
To summarize the above results, while it is possible today to run HPC workloads securely in the cloud (like Google cloud), there are limitations:
- Only 8 total vCPUs (for now) in Google cloud, which severely limits the kind of HPC workloads which can be executed on these resources.
- While data is stored encrypted, communication is in the clear necessitating application-specific solutions or VPN.
- Using a VPN for secure communication is undesirable due to the performance overheads.
Appendix
Next, is a discussion of the steps taken to set up the VMs on Google cloud and the software installed in order to perform the experiments which produced the data shown above.
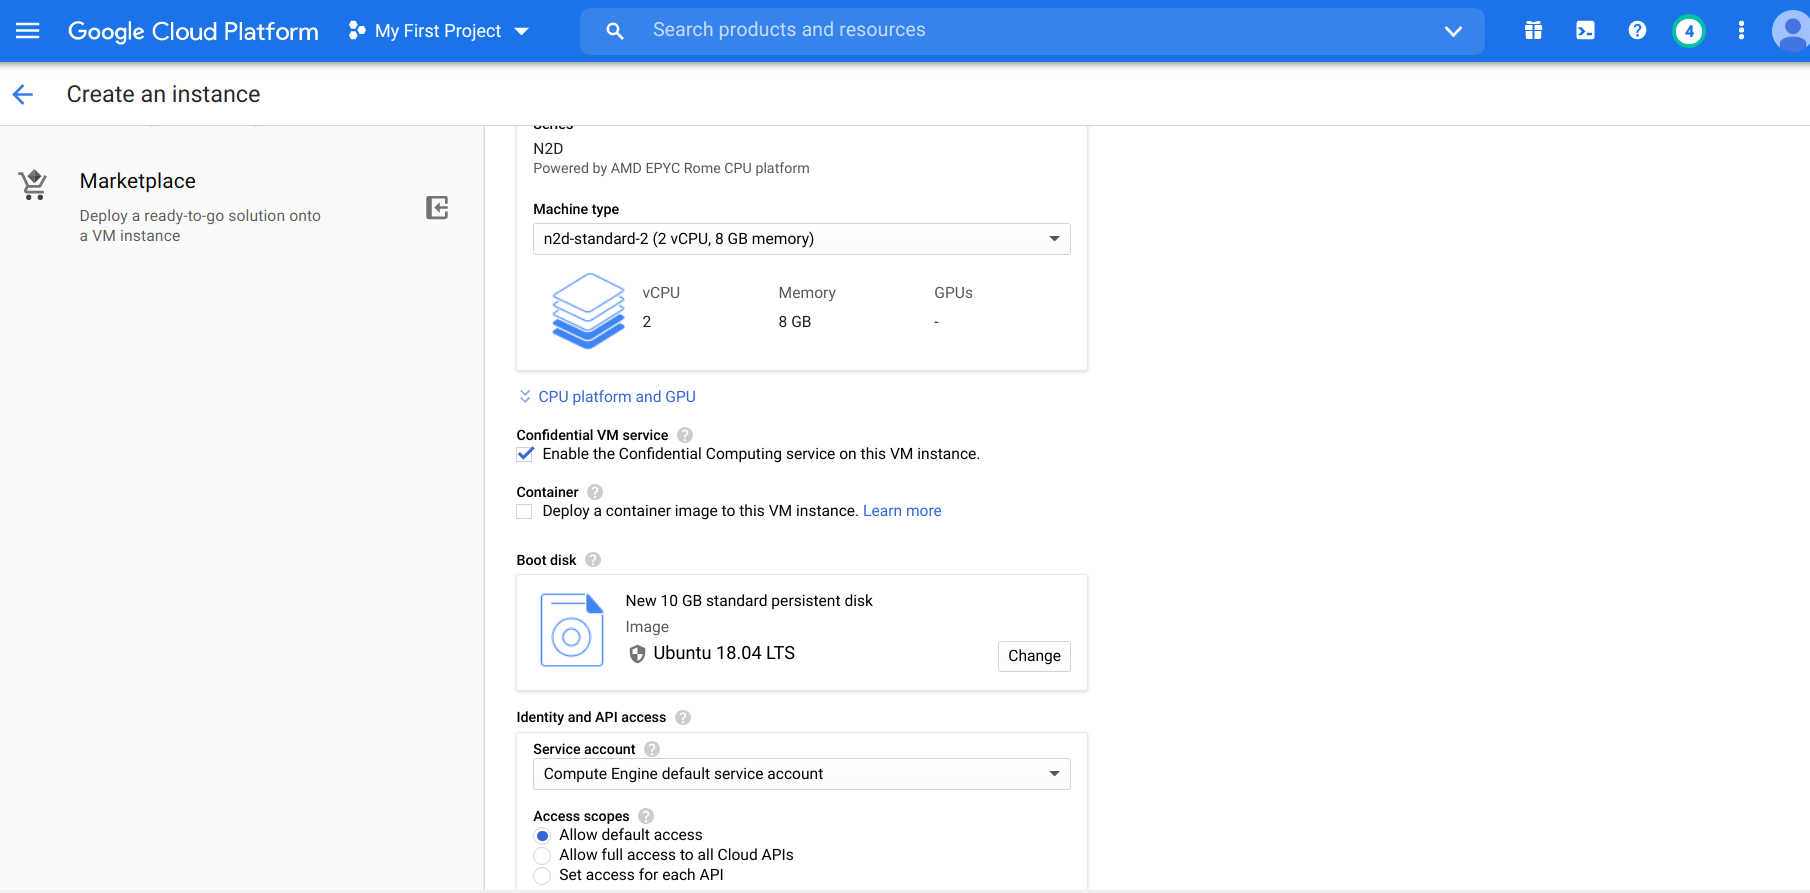
Setting up Confidential VM in Google Cloud
On Google Cloud Compute Engine, when you try to create your VM instance from CREATE INSTANCE OPTION, select the option of Confidential VM Service as shown in Figure 5. This will automatically change the machine type to correct option (namely N2D series, which are powered by AMD EPYC Rome CPU). There are options of different virtual CPUs and memory (high memory or high CPU count options are provided too). However, currently (last checked in the first week of November 2020), Google Cloud does not allow using more than 8 vCPUs per data center in total. So, we will rely on setting up two VMs each of 4 vCPUs for this blog. We expect that these limitations will be relaxed in future.
Once you create your instances (two in this case), you can access them through SSH tab, which will open a secure SSH window, with direct access to the VM. You can verify that SEV is enabled on these instances by running:
ls -l /dev/sev
If SEV is enabled, the above command should not complain about /dev/sev being not present.
Install the required libraries:
sudo apt-get update && sudo apt-get install autoconf make gcc gfortran libtool numactl libnuma-dev g++ flex
VPN Set up
First, we will set up a VPN connection
We will use OpenVPN for VPN connection.
Most of these instructions are based on this article. Below is a brief summary of all the steps needed to be taken, but if you are interested to know the detailed reason for every step, please refer to the article.
We will assume that first VM instance will act as a server and the other as a client.
First, install OpenVPN and EasyRSA (EasyRSA will be used for setting up certificates):
sudo apt-get update
sudo apt-get install openvpn easy-rsa
Setting up the certificates:
make-cadir ~/openvpn-ca
cd ~/openvpn-ca
There should be a file titled vars in this directory, which contains most of the configuration parameters for certificate creation. If you want, you can different parameters (like KEY_COUNTRY, KEY_EMAIl etc.) which are used in the key creation or just keep them to their default values.
Then,
source vars
Now, to build certificates:
./build-ca
For server certificate and key:
./build-key-server server
If you want you can enter a challenge password at this point or just keep it blank and press enter.
Then, generate a Diffie-Hellman key:
./build-dh
openvpn --genkey --secret keys/tiv.key
We will create the client certificate on the same machine as well:
cd ~/openvpn-ca
source vars
./build-key client
Now to set up the OpenVPN server (OpenVPN installation should have already created /etc/openvpn):
cd ~/openvpn-ca/keys
sudo cp ca.crt server.crt server.key tiv.key dh2048.pem /etc/openvpn
Using the default sample configuration for OpenVPN server:
gunzip -c /usr/share/doc/openvpn/examples/sample-config-files/server.conf.gz | sudo tee /etc/openvpn/server.conf
Next, we need to edit this configuration file:
sudo nano /etc/openvpn/server.conf
Find tls-auth tiv.key 0 in the file and remove a ; in front of it and add key-direction 0 under it:
tls-auth tiv.key 0 # This file is secret
key-direction 0
Uncomment the AES-128-CBC line and add auth below it:
cipher AES-128-CBC
auth SHA256
Then uncomment:
user nobody
group nogroup
Also uncomment the lines containing dhcp-option:
push "dhcp-option DNS 208.67.222.222"
push "dhcp-option DNS 208.67.220.220"
We will use UDP for communication, so make sure that it is uncommented and TCP is commented. Also, you can configure any port number you want to use (the default is UDP:1194):
port 443
;proto tcp
proto udp
Make sure, in your file, you also have:
cert server.crt
key server.key
Save all the settings and close /etc/openvpn.
Some other changes that are needed in the OS settings:
Open sudo nano /etc/sysctl.conf and uncomment:
net.ipv4.ip_forward=1
Save and close the file and run sudo sysctl -p for this change to take effect.
To update firewall rules, first check:
ip route | grep default
Note the interface from the above command that has dev in it.
For instance if it is ens0, we will udpate firewall rules as follows:
sudo nano /etc/ufw/before.rules
Add the following lines:
# OPENVPN
# NAT Table
*nat
:POSTROUTING ACCEPT [0:0]
# OpenVPN client traffic
-A POSTROUTING -s 10.8.0.0/8 -o ens0 -j MASQUERADE
COMMIT
# OPENVPN
Save and close and do
sudo nano /etc/default/ufw
and change DEFAULT_FORWARD_POLICY to ACCEPT.
Save and close.
OpenVPN server can then be started using:
sudo systemctl start openvpn@server
You can check the status of this service using:
sudo systemctl status openvpn@server
Now for client configuration:
mkdir -p ~/clients/files
chmod 700 ~/clients/files
cp /usr/share/doc/openvpn/examples/sample-config-files/client.conf ~/clients/base.conf
Edit the file nano ~/clients/base.conf
Find the remote directive and add your server’s IP address and port number for OpenVPN:
remote [server IP] [port number]
Make sure the proto is set to udp as in server’s configuration above.
Uncomment:
user nobody
group nogroup
Comment the following lines:
# ca ca.crt
# cert client.crt
# key client.key
Make sure you have the following in your file as well:
cipher AES-128-CBC
auth SHA256
key-direction 1
Also add
script-security 2
up /etc/openvpn/update-resolv-conf
down /etc/openvpn/update-resolv-conf
Save and close and then edit nano ~/clients/gen_config.sh with the following:
#!/bin/bash
KEY_DIR=~/openvpn-ca/keys
OUTPUT_DIR=~/clients/files
BASE_CONFIG=~/clients/base.conf
cat ${BASE_CONFIG} \
    <(echo -e '<ca>') \
    ${KEY_DIR}/ca.crt \
    <(echo -e '</ca>\n<cert>') \
    ${KEY_DIR}/${1}.crt \
    <(echo -e '</cert>\n<key>') \
    ${KEY_DIR}/${1}.key \
    <(echo -e '</key>\n<tls-auth>') \
    ${KEY_DIR}/tiv.key \
    <(echo -e '</tls-auth>') \
    > ${OUTPUT_DIR}/${1}.ovpn
Run this script:
chmod 700 ~/clients/gen_config.sh
cd ~/clients
./gen_config.sh client
This should generate client.ovpn in ~/clients/files/.
From your SSH session you can download /home/username/clients/files/client.ovpn using the Download file option and upload it to the client VM instance (again using the upload option on SSH session).
Make sure the libraries (including OpenVPN) are installed on the client VM as well and run
sudo openvpn -- config client.ovpn
If everything worked well this should create a VPN connection between the server and client. Your SSH connection window on client VM will go unresponsive as it is now tunneling all internet traffic through the server.
You can directly create an SSH connection from inside the server to access the client.
Setting up the System to Run HPC-like Workloads
Next, we will look at the steps to install all the required libraries needed to run MPI (mesage passing interface) workloads in our 2 node system.
UCX Installation
First create a directory .ucx in your home directory and then run:
git clone https://github.com/openucx/ucx.git ucx
cd ucx
git checkout v1.8.1
./autogen.sh
mkdir build
cd build
../configure --prefix=/home/"$USER"/.ucx/
make -j4
make install -j4
OpenMPI Installation
Create a directory .openmpi in your home directory and then run:
git clone https://github.com/open-mpi/ompi.git
cd ompi
git checkout v4.0.4
./autogen.pl
mkdir build
cd build
../configure --prefix=/home/"$USER"/.openmpi/ --with-ucx=/home/sev/.ucx/
make -j4
make install -j4
OSU MPI Micro-benchmarks
To compile OSU MPI microbenchmarks:
wget http://mvapich.cse.ohio-state.edu/download/mvapich/osu-micro-benchmarks-5.6.3.tar.gz
tar -xzvf osu-micro-benchmarks-5.6.3.tar.gz
cd osu-micro-benchmarks-5.6.3
./configure CC=/home/sev/.openmpi/bin/mpicc CXX=/home/sev/.openmpi/bin/mpicxx
make -j64
The above UCX, OpenMPI and OSU microbenchmarks installation process should be performed on all nodes in the system.
Now you can run any of these workloads using commands like the following:
/home/"$USER"/.openmpi/bin/mpirun -mca btl self -x UCX_NET_DEVICES=tun0 -x UCX_TLS=tcp -np 2 -host [Client-IP-Address],[Server-IP-Address] /home/"$USER"/osu-micro-benchmarks-5.6.3/mpi/pt2pt/osu_bw
Note: The above command should be run on the client machine and tun0 in this command is the network interface for the tunnel connection.
Issues and Solutions
Updating the grub configuration in Google Cloud VMs:
sudo vim /etc/default/grub.d/50-cloudimg-settings.cfg
To generate ssh key and configure password less ssh connection with other VMs (required to run MPI workloads):
ssh-keygen
copy id_rsa.pub to authorized_keys of other device